A/B Testing
A/B testing intro

Table of Contents
Codesphere allows you to easily distribute traffic to different versions of your website in order to A/B test variations.To do this, we’ll create two workspaces for our project, which will serve as our control and variant versions of the website in our experiment. Then, we will use Codesphere built in SQLite support to keep track of visitors and conversion events. Finally, we will connect both of these workspaces to our domain to distribute traffic between them.
Setting up Our Variants
To create our variants, we simply need to make identical workspaces for our production environments and deploy all of them from Codesphere. In this example we’ll create two variants of a basic html site, each with a different font size for our signup button.You can start by creating our two workspaces from this GitHub repo: https://github.com/codesphere-cloud/AB-Testing-DemoThen in our variant workspace, we’ll head to the index.html file to change the font-size of the button.
button {
	font-size: 20px;
}
Make sure that all of our workspaces are on a paid plan so that they will be live even when we aren’t actively working in the workspace:
In each of our workspaces, we can install our dependencies and run our apps with: yarn install && node index.js
Storing Our Conversion Data
Feel free to skip this section if you have your own database that you want to implement to send conversion data to.We’re going to use Codesphere’s SQLite support to track how many visitors and conversions we get on each site.To do so, in each of our workspaces navigate to Setup > DatabasesFrom there, press “New Database +”, and name it whatever you want(We’ll call it traffic).Then press on our new database to enter the query editor.We’ll use the query editor to create a 2x2 table that tracks visits and signups, with one row initialized with 0 visits and 0 signups.We can create our table with:
CREATE TABLE traffic (visits int,signups int)And initialize our row with:
INSERT INTO trafficVALUES (0, 0)Let’s then add routes to increment our visits and signups columns in index.js using the sqlite3 package:
const sqlite3 = require('sqlite3').verbose()
const path = require('path')
const express = require('express')

const app = module.exports = express()

let db = new sqlite3.Database('./traffic.db')

const INCR_VISITS = 'UPDATE traffic SET visits = visits + 1'
const INCR_SIGNUPS = 'UPDATE traffic SET signups = signups + 1'

app.use('/', express.static('public'))

app.post('/addVisit', (req, res) => {
	db.run(INCR_VISITS)
})

app.post('/addSignup', (req, res) => {
	db.run(INCR_SIGNUPS)
})

app.listen(3000)
And then update our index.html to call the addVisit endpoint on render, and the addSignup endpoint when the button is clicked:
<html>
	<head>
		<script>
		fetch('/addVisit', {method: 'POST'})
		</script>
		<style>
			body {
				display: flex;
				justify-content: center;
				align-items: center;
			}
			button {
				font-size: 14px;
			}
			div {
				display: flex;
				justify-content: center;
				align-content: center;
				flex-direction: column;
			}
		</style>
	</head>
	<body>
		<div>
		<h1>Welcome to my website</h1>
		<button onclick = "fetch('/addSignup', {method: 'POST'})">Sign up!</button>
		</div>
	</body>
</html>
Connecting Our Variants to Our Domain
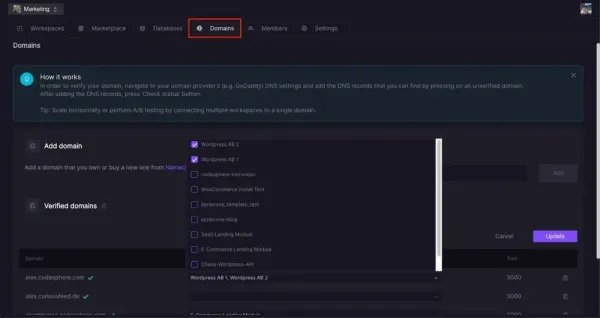
Now all that is left to do is connect our variants’ workspaces to our domain. Our domain in this example is mycodespheredomain.com and it is already setup in our domains dashboard.To connect our workspaces, select the Edit button under Verified Domains and select our two variants in the workspaces dropdown for our domainFrom there, our variants are connected to our domain!
A/B Testing
Codesphere will now automatically evenly distribute visitors to each of the two versions. Note that we can use this method with however many variants we want! This doc showed the basic concept of A/B testing with Codesphere. For a more hands on real world example (i.e. how to test two e-commerce checkout variants with Codesphere and Posthog analytics) head over to tutorials.

