Public API
Connect any third party tool that can make HTTP requests to Codesphere via our public API.
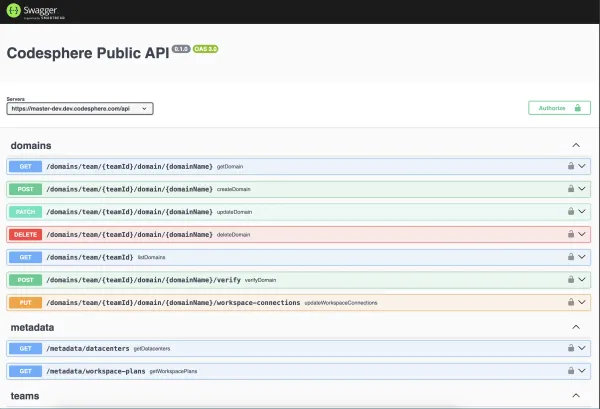
Table of Contents
There are many scenarios where you may want to connect Codesphere to a third party system or automate certain workflows related to Codesphere to fit your teams needs.
The actually available endpoints in the most up to date version can be found at https://codesphere.com/api/swagger-ui or if your company is running their own Codesphere installations at https://[Your_Base_URL]/api/swagger-ui.
The swagger UI is always up to date and allows testing each endpoint directly from the UI. The rest of this document walks through the authentication process and showcases some examples how to use the API.
Authentication
Many endpoints require authentication via an API key. You can create those inside of Codesphere through the account avatar menu in the top right corner. Under API keys you can create as many tokens as you need. Be sure to copy the token after it is created - you won't be able to retrieve it later.
This token currently acts as a personal access token to authorize the API to act on your behalt. That means it has the same access level as your account - it will be able to see and interact with all resources of teams that you are part of. We will be adding fine-grained tokens with more granular control down the road.
Once you have your API key ready you can start interacting with the endpoints. The Swagger UI also has an option to drop in the API key as bearerAuth - once entered you can start testing the endpoints.

Popular API testing tools like Postman also allow adding these tokens for more extensive testing.
Release Flow
While individual endpoints can be valuable on their own, the real value stems from combining multiple API calls to form a complete user flow.
The first example we want to look at is creating a release via a script (i.e. run on merge in a GitHub action).
Simple release case
- Perform a git pull in your workspace via the api
/workspaces/{workspaceId}/git/pull/{remote}for example:/workspaces/64286/git/pull/origin - (Optional) Rebuild your application with
/workspaces/{workspaceId}/pipeline/prepare/start - Wait for the prepare stage to finish i.e. poll
/workspaces/{workspaceId}/pipeline/prepareuntil it returns 200 - Stop your application by first stopping the run stage with
/workspaces/{workspaceId}/pipeline/run/stop - Restart the application with
/workspaces/{workspaceId}/pipeline/run/start
Automating zero downtime releases
The simple case is great for static websites and applications that can restart instantly (i.e. we use it for our website). However if you want to automate a zero downtime release this is also doable. On your desired trigger (i.e. a merge or manually) execute the following flow:
- Create a new workspace with the desired git commit via
/workspaces, you'll need the team id, plan id, git url (+ boolean if private or not), branch and number of replicas. - Install & Build all required dependencies by running the prepare stage
/workspaces/{workspaceId}/pipeline/prepare/startdd - Wait for the prepare stage to finish i.e. poll
/workspaces/{workspaceId}/pipeline/prepareuntil it returns 200 - (Optional) If your ci.yml defines unit tests or the like in the test stage run them and check the result with
/workspaces/{workspaceId}/pipeline/test/start - (Optional) Wait for the test stage to finish i.e. poll
/workspaces/{workspaceId}/pipeline/testuntil it returns 200 - stop proceeding if any test fails. - Start the application with
/workspaces/{workspaceId}/pipeline/run/start - (Optional) Run integration test pipelines against the newly created workspace URL or manually check if the new application and git commit perform as planned.
- If successful continue by updating the workspace connected to your productive domain with
/domains/team/{teamId}/domain/{domainName}/workspace-connections- the latest schema needed for can be found in Swagger.
